Vagrant+VirtualBox環境の構築7(IPython Notebook+CentOS)
IPython Notebookの外部出力
pyQtは下で落とす
http://pkgs.org/centos-6-rhel-6/centos-rhel-x86_64/PyQt4-4.6.2-9.el6.x86_64.rpm/download/
$ sudo yum localinstall PyQt4-4.6.2-9.el6.x86_64.rpm
matplotlib、scipy、numpy等はeasy_installで
$ sudo easy_install numpy scipy tornado pyzmq pandas ipython pygments matplotlib
IPythonの設定
$ ipython profile create myserver
$ sudo vi ~/.ipython/profile_myserver/ipython_notebook_config.py
ipython_notebook_config.pyを一部変更
c = get_config()

c.IPKernelApp.pylab = 'inline'
c.NotebookApp.ip = '*'
c.NotebookApp.open_browser = False
#ポート指定
c.NotebookApp.port = 9999
CentOSのファイアウォールを切る
$ sudo service iptables stop
IPythonの立ちあげ
$ ipython notebook --prifile=myserver
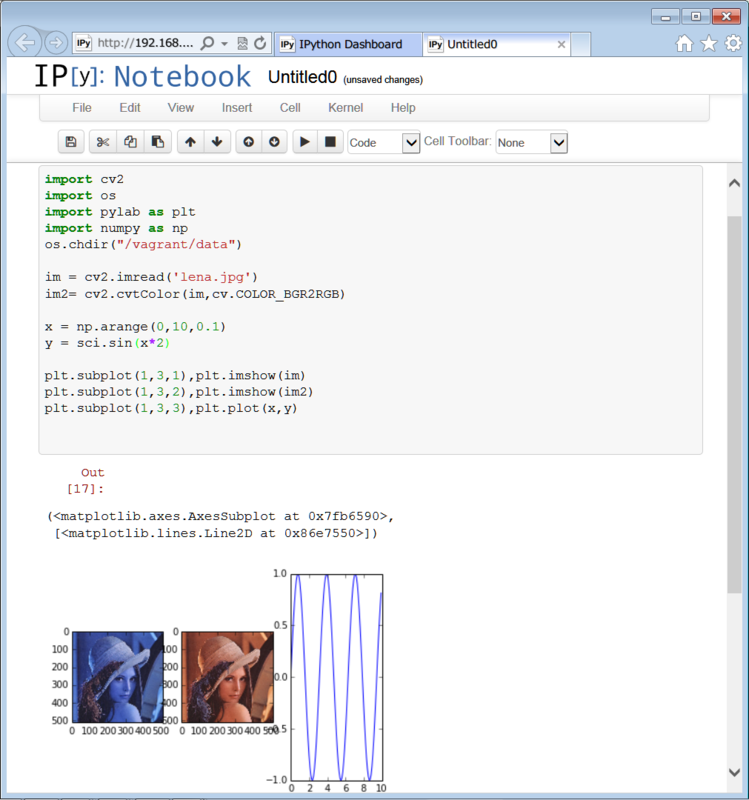
http://192.168.33.10:9999
ipython notebookがvagrantの外部環境から使用可能。

Vagrant+VirtualBox環境の構築6(CentOS)
nginx + gunicorn + Djangoで
基本ここの通り
http://source.hatenadiary.jp/entry/2013/06/11/132346
gunicornのインストール
$ sudo easy_install gunicorn
nginxのインストール
$ sudo yum install nginx
ログファイル用のフォルダ作成
$ sudo mkdir /etc/logs
nginx.conf ファイルを編集
$ sudo vi /etc/nginx/nginx.conf
nginx.conf
user  nginx;
worker_processes  1;
error_log  logs/error.log;
pid        logs/nginx.pid;

events {
    worker_connections  1024;
}

http {
    include       mime.types;
    default_type  application/octet-stream;

    sendfile        on;
    keepalive_timeout  65;

    server {
        listen       80;

        server_name  localhost;

        location / {
            proxy_pass http://127.0.0.1:8000;
            proxy_set_header Host $host;
            proxy_set_header X-Real-IP $remote_addr;
            proxy_set_header X-Forwarded-For $proxy_add_x_forwarded_for;
        }

        error_page   500 502 503 504  /50x.html;
        location = /50x.html {
            root   html;
        }
    }
}
djangoのsettings.py設定に追記
$ sudo vi settings.py
#INSTALLED_APPSの以下の行を追加
'gunicorn',
CentOSのファイアウォールを切る
$ sudo service iptables stop
djangoをgunicornで実行
$ python2.7 manage.py run_gunicorn 192.168.33.10:8000
http://192.168.33.10:8000
404画面
http://192.168.33.10:8000/admin
管理画面
Vagrant+VirtualBox環境の構築5(Django+Mysql+CentOS)
vagrantfieの下記行にてIPを指定
config.vm.network :private_network, ip: "192.168.33.10"
SentOSのファイアウォールを解除
sudo service iptables stop
これでVagrnt中CentOSのweb画面が確認可能
http://192.168.33.10
Djangoの起動と設定
$ cd /var/www
$ django-admin.py startproject opencv
$ cd opencv
$ sudo vi settings.py
#INSTALLED_APPSの以下の行にてコメントを外す
'django.contrib.admin',
$sudo vi urls.py
#urls.pyの以下の行にてコメントを外す
from django.contrib import admin
admin.autodiscover()
url(r'^admin/', include(admin.site.urls)),
$ cd..
$ python2.7 manage.py runserver
http://localhost:8000/admin/
に管理画面が出る。下記記載にて出力IPとポート指定も可
$ python manage.py runserver IPアドレス:ポート
$ easy_install mysql-python
MySQLにユーザー追加
#ログイン
$ mysql -u root -p

#全権ユーザーの追加
mysql> GRANT ALL ON *.* TO ユーザー名@"localhost"IDENTIFIED BY "パスワード";
Query OK, 0 rows affected (0.00 sec)
#反映させる
mysql> FLUSH PRIVILEGES;
Query OK, 0 rows affected (0.00 sec)
#データベースの作成
mysql> create database opencv;
Query OK, 1 row affected (0.00 sec)
MySQLの使用に向けたsettings.pyの編集
$ cd /var/www/opencv
$ sudo vi settings.py

DATABASES = {
 'default': {
 'ENGINE': 'django.db.backends.mysql',
 'NAME': 'opencv',
 'USER': 'ユーザー名',
 'PASSWORD': 'パスワード',
同期
$ python manage.py syncdb
Vagrant+VirtualBox環境の構築4(Mysql+CentOS)
MySQL5.6のインストール
参考
http://kurukuru-labo.com/tech/2013/05/centos6-4%E3%81%ABmysql5-6%E3%82%92%E3%82%A4%E3%83%B3%E3%82%B9%E3%83%88%E3%83%BC%E3%83%AB%E3%81%99%E3%82%8B/
http://y-ken.hatenablog.com/entry/how-to-install-mysql5.6.x-with-mroonga-for-centos6
ダウンロード
http://cdn.mysql.com/Downloads/MySQL-5.7/MySQL-shared-compat-5.7.1_m11-1.linux_glibc2.5.x86_64.rpm
http://cdn.mysql.com/Downloads/MySQL-5.6/MySQL-client-5.6.13-1.linux_glibc2.5.x86_64.rpm
http://cdn.mysql.com/Downloads/MySQL-5.6/MySQL-server-5.6.13-1.linux_glibc2.5.x86_64.rpm
#mysql-pythonのmysql_configとmysqlclient_r用
http://cdn.mysql.com/Downloads/MySQL-5.6/MySQL-devel-5.6.13-1.linux_glibc2.5.x86_64.rpm
http://cdn.mysql.com/Downloads/MySQL-5.6/MySQL-shared-5.6.13-1.linux_glibc2.5.x86_64.rpm
/vagrantにコピーしてインストール
$ sudo yum localinstall MySQL-shared-compat-5.7.1_m11-1.linux_glibc2.5.x86_64.rpm
$ sudo yum localinstall MySQL-server-5.6.13-1.linux_glibc2.5.x86_64.rpm
$ sudo yum localinstall MySQL-client-5.6.13-1.linux_glibc2.5.x86_64.rpm
#mysql-pythonのmysql_configとmysqlclient_r用
$ sudo yum localinstall MySQL-devel-5.6.13-1.linux_glibc2.5.x86_64.rpm
$ sudo yum localinstall MySQL-shared-5.6.13-1.linux_glibc2.5.x86_64.rpm
mysqlスタート
$ sudo service mysql start
初期パスワードの確認
XXXXXXXXの部分がパスワード
$ sudo cat /root/.mysql_secret
# The random password set for the root user at Sun Aug 18 01:52:21 2013 (local time): XXXXXXX
ログイン
$ mysql -u root -p
#先ほどのパスワード入力
Enter password:
#パスワード変更
mysql > SET PASSWORD FOR root@localhost=PASSWORD('NEWPASSWORD');
#反映
mysql> FLUSH PRIVILEGES;
Vagrant+VirtualBox環境の構築3(CentOS)
参考
http://dqn.sakusakutto.jp/2013/08/windows_vagrant_ssh.html
http://qiita.com/ogomr/items/0a2ac80206bad4fa3089
C:\HashiCorp\Vagrant\embedded\bin\mintty.exe の使い方
#使えない
$ vagrant ssh
下記のコマンドを一度実行
#sshのログイン情報を書き込む
$ vagrant ssh-config >> ~/.ssh/config
以後は下記でログイン可能
$ ssh default
viが使いやすくなるね。
Vagrant+VirtualBox環境の構築2(CentOS)
python2.7のインストール
参考
http://3rd-tl.blogspot.jp/2013/05/centosyumpython.html
$ sudo rpm -ivh http://dl.iuscommunity.org/pub/ius/stable/CentOS/6/x86_64/epel-release-6-5.noarch.rpm
$ sudo rpm -ivh http://dl.iuscommunity.org/pub/ius/stable/CentOS/6/x86_64/ius-release-1.0-11.ius.centos6.noarch.rpm
$ sudo yum install python27
依存パッケージのインストール
#png jpg tiff
$ sudo yum install libpng-devel libjpeg-devel  png, jpeg
$ sudo yum install libtiff-devel
#GUIサポート
$ sudo yum install gtk2-devel
#java
$ sudo yum install java-1.6.0-openjdk java-1.6.0-openjdk-devel ant
#ffmpeg
$ sudo yum install --enablerepo=rpmforge ffmpeg-devel

$ sudo yum install blas-devel
$ sudo yum install lapack-devel
$ sudo yum install python27-devel
numpy
http://sourceforge.net/projects/numpy/files/NumPy/1.7.1/numpy-1.7.1tar.gz
$ cd /vagrant/numpy-1.7.1
$ sudo python2.7 setup.py build
$ sudo python2.7 setup.py install
opencvのソースファイル取得
#gitインストール
$ sudo yum install git
#Opencvのソース取得
$ git clone git://github.com/Itseez/opencv.git
時刻エラー対策
$ sudo rm -f /etc/localtime
$ sudo  cp -p /usr/share/zoneinfo/Japan /etc/localtime
$ date
$ sudo yum -y install ntp
$ sudo yum ntpdate ntp.nict.jp
共有フォルダへコピーして移動
#共有フォルダへ移動
$cd /vagrant
$sudo yum localinstall  cmake-2.8.9-3.1.x86_64.rpm
make
参考
http://rest-term.com/technote//index.php/OpenCV%20-%202.x
#opencvフォルダへ移動
$ cd ~/opencv
#cmake
$ cmake -D CMAKE_C_COMPILER=/usr/bin/gcc\
        -D CMAKE_BUILD_TYPE=RELEASE \
        -D CMAKE_INSTALL_PREFIX=/usr/local/ \
        -D BUILD_opencv_world=ON \
        -D BUILD_NEW_PYTHON_SUPPORT=ON \
        -D PYTHON_EXECUTABLE=/usr/bin/python2.7\
        -D PYTHON_LIBRARY=/usr/lib64/libpython2.7.so.1.0\
        -D PYTHON_INCLUDE_PATH=/usr/include/python2.7 \
        -D HAVE_OPENMP=ON \
        -D BUILD_EXAMPLES=ON \
        -D INSTALL_C_EXAMPLES=ON \
        -D INSTALL_PYTHON_EXAMPLES=ON .
#4コアでmake(j+使用コア数)
$ make -j4
#中間ファイルの削除(数ギガある)
$ make clean
$ sudo make install
エイリアスの設定
$ cd ~
$ vi .bashrc
# User specific aliases and functions
#追記
alias python='python2.7'
export PYTHONPATH=/usr/local/lib/
export PYTHONPATH=/usr/local/lib/python2.7/site-packages
$ souce .bashrc
$ which python #確認
scipy+Opencv+numpyによる画像分類2
切り出したイメージからの続き。
import numpy as np
import cv2
import matplotlib.pyplot as plt

im = cv2.imread('bubbles.jpg')
im2 = cv2.imread('bubble2.jpg',0)

imgray = cv2.cvtColor(im,cv2.COLOR_BGR2GRAY)
ret,thresh = cv2.threshold(imgray,100,255,0)

contours, hierarchy = cv2.findContours(thresh,cv2.RETR_TREE,cv2.CHAIN_APPROX_SIMPLE)

i=3
for h,cnt in enumerate(contours):
    area = cv2.contourArea(cnt)
    if area >10000:
        mask = np.zeros(imgray.shape,np.uint8)
        cv2.drawContours(mask,[cnt],0,255,-1)
        #mean = cv2.mean(im2,mask = mask)
        #print mean
        plt.subplot(3,3,i),plt.imshow(mask,'gray')
        plt.axis('off')
        i+=1
        if i == 10:
            break
    else:
        pass
plt.subplot(3,3,3),plt.imshow(im2,'gray')
plt.axis('off')
plt.subplot(3,3,2),plt.hist(im.flat,bins=255,range=(0,255))
plt.subplot(3,3,1),plt.imshow(im,'gray')
plt.axis('off')

plt.show()

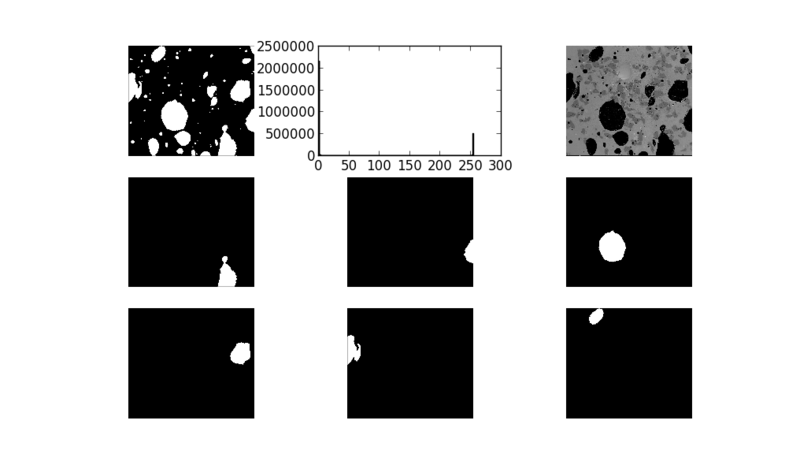
マスク画像が出来た。
mask2 =np.asarray(mask,np.bool8)
bubbles[-mask2]=0
で元画像をマスク出来る。
後日修正予定。
参考
http://opencvpython.blogspot.jp/2012/06/hi-this-article-is-tutorial-which-try.html